
It seems such an easy thing to buy, that most of us don’t even think about recovering our ironing board. But really, if you have the fabric, and the skills (not that its complex to do), then why not be like our mother’s, and “make do” ??
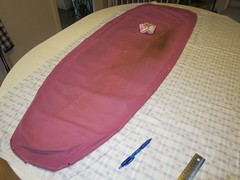
So ….. lets get started! First, take the old cover and padding off the ironing board. As you can see I have used the old cover and padding to trace the top fabric and batting. Appropriate fabrics could be 100% cotton, drill, heavy chambray or even denim. For the padding, quilt batting is good, I used insulbrite but its not essential, and an old woollen blanket is the usual standby.
 Â Â Â Â Â Â
      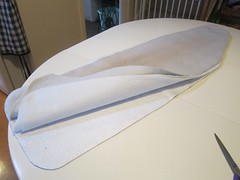
With the benefit of hindsight now, I would recommend that you don’t use the old cover for this. Age and constant stretching mean the cover is misshapen, and the padding shrinks from the steam of the iron. I would recommend you instead place the naked ironing board upside down onto an old sheet, and then trace around the exterior. Use that outline to cut the padding, and then add about 3 inches all round to get your top fabric outline. The result will be less wonky.
Place your padding on top of the board to check placement. See what I mean about wonky shaping at the two ends?
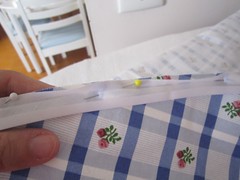
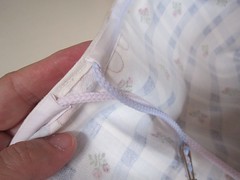
Next, open out one side and pin on some bias to the right side of the top fabric, leaving a gap at the squarish end. Sew along the bias, just before the crease line, about 1/4 of an inch. Turn the bias to the inside and sew again close to the folded edge.  You could just turn under the edge and hem, but this method appeals to my inner obsessive, and I adore a neat edge.
 Â Â Â Â
    
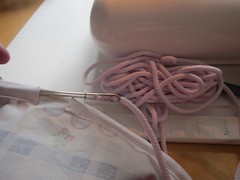
If you use wide bias you can then use a baby safety pin to thread your cord. I didn’t, and thank god I had a bodkin, otherwise I would still be threading with a tiny safety pin. Pull the cord all the way around the edge of the cover (preying you don’t slip the cord out of the pin, and therefore have to pull it out and start again). Here you can see the gap I left at the start and finish of the bias.
 Â Â Â Â
Thread the cord through the cord toggle (some sticky tape on the ends helps here), and then tie a couple of good firm knots.

Place onto the board, pointy end first. Take your time, and pull up the cord little bits at a time. You may need to put your hand underneath and pull the padding into place at the pointy end, as it will tend to slide down as you pull on the new cover. Pull it as tight as you can, distributing the gathers as you go, until its firm and not inclined to slip around.

Look underneath, and check that its not sitting more on one side than the other.

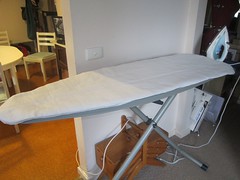
And there you go …. you have successfully recovered your ironing board. You have saved money, done wonders for the environment, and added more to your sewing cred.
Love your fabric!
I bought a new cover recently and thought, “I don’t particularly like this fabric and it doesn’t fit properly either!” It didn’t actually occur to me to make my own. Weird.
Love yours.